Web Firmware Updater
On Windows an appropriate WinUSB/libusb driver must first be installed. This can be done manually with Zadig. See the section below for some help installing the drivers.
Legacy Windows Firmware Updater
The Windows version of the Firmware Updater requires drivers to be installed. There is a separate driver required for AVR-based and ARM-based products. Install one or both of the drivers depending on which product(s) you will be updating. Instructions for the driver installation are given below.
If you have a Mac available to update your module, it is a much easier process if you are uncomfortable with installing hardware drivers on your PC, since these steps are not required on macOS.
Get Started
- Download the Latest firmware for your module from the support page.
- Unzip the downloaded zip file. It should contain four files:
Intellijel Firmware Updater.exeusbtiny_windowsxp7.zipusbtiny_windows8.zipzadig_2.2.exe
- Follow the instructions below to install the driver(s) for your product(s).
- Go back to where you extracted your download of the Firmware Updater and launch the app by double-clicking
Intellijel Firmware Updater.exe - Continue to the Usage section below for instructions on how to upgrade your module firmware.
First Time Updating — Install the ARM STM32 Bootloader Drivers
Applies to all newer modules with a USB port on the back of the module.
Once you have completed this procedure for your module, you will be able to update in the future without installing the drivers again.
- Open
intellijel Firmware Updater.exeand select a module for the module-specific instructions on how to activate bootloader mode. - Connect a USB cable to your module and computer and start the module in bootloader mode using the instructions from Step 1.
- Depending on your settings, Windows may indicate it’s attempting to find a driver:

- If you see this notification, you’ll find that the driver installation fails:

- When it fails, or if you do not see a notification, double click on the
zadig_2.2.exefile which extracted from the downloaded zip file. - The driver installer software, “Zadig”, will appear with the window as below. Ensure that the device “STM32 BOOTLOADER” or “DFU in FS Mode” is selected in the dropdown and that the driver is set to “WinUSB”. Note that you may need to enable “List all devices” in the Zadig options to see the “STM32 BOOTLOADER” or “DFU in FS Mode“ device.

- Click the large “Install Driver” button. You will be prompted to confirm the driver installation. Click the “Install” button:

- Windows will install the driver. If everything completes successfully you should see the “STM32 Bootloader” device appear in the “Universal Serial Bus devices” section of Device Manager.


Legacy AVR USB ISP driver
This driver is required for Metropolis, Mutamix, Plog, µScale, or µStep only.
- The zip files prefixed with usbtiny_ contain the necessary drivers for the ISP. Depending on if you are on Windows XP/7 or Windows 8, unzip the corresponding zip file.
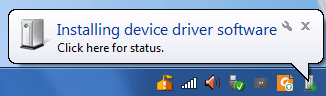
- Connect the USB ISP to your computer’s USB port. Windows will indicate it’s attempting to install a driver.

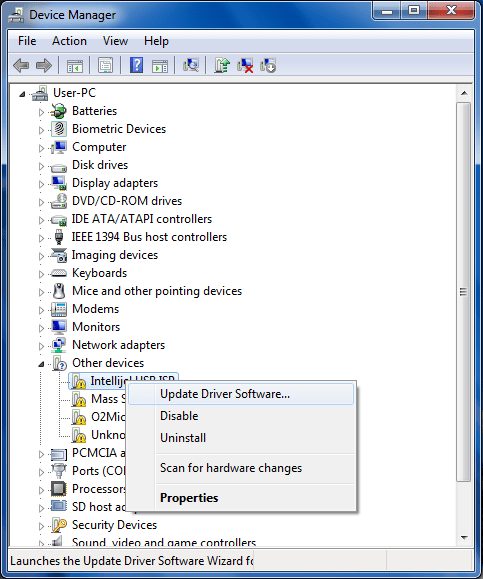
- Go to the start menu and search for and launch “Device Manager”
- In “Device Manager” under “Other devices” you should see a device named “Intellijel USB ISP” (or for some versions of the device, “FabISP”). Right click on the device and select “Update Driver Software…”

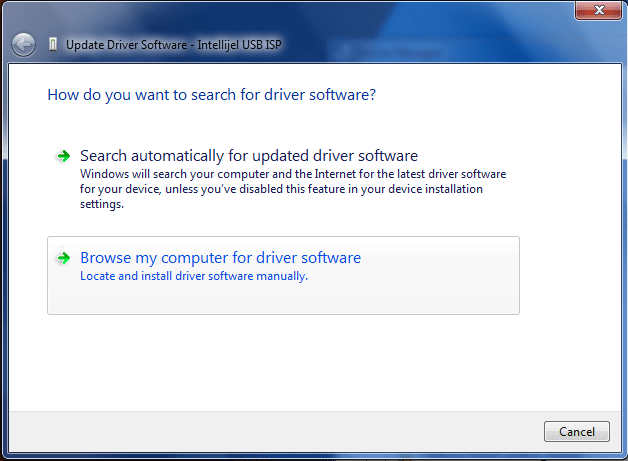
- From the next dialog select “Browse my computer for driver software”:

- Browse to the location where you extracted the zip file containing the driver and select the driver directory:

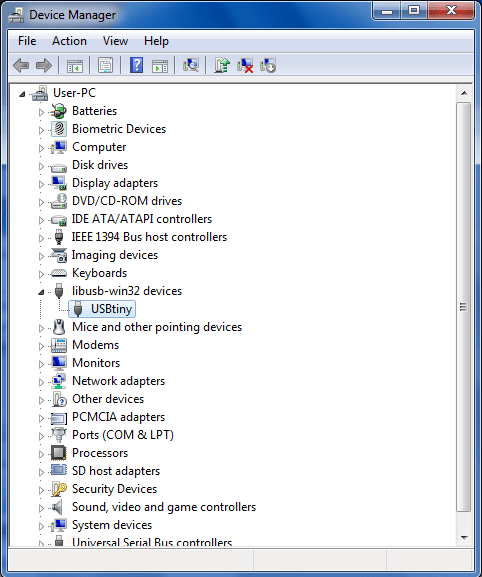
Click “Next”. - Windows will install the driver. If everything completes successfully you should see a new category in “Device Manager” called “libsusb-win32 devices” with a device called “USBtiny”. You’re now ready to use the Firmware Updater.


Legacy USB ISP Firmware Update Process
The USB-ISP is only required for Metropolis, Mutamix, Plog, µScale, or µStep only. All other firmware updatable modules only require a standard mini or micro USB cable.
Once you’ve installed and launched the Firmware Updater application, follow these instructions to update the firmware of your module:
- Connect the Intellijel USB ISP or USB Port on the Module to your PC or Mac computer’s USB port.
- Connect the ribbon cable from the USB ISP to the port labelled “ICSP” on the back of your module. Ensure the side of the cable with the red stripe is next to the white line on the PCB.

- Leave the module connected and powered by your Eurorack power supply.
- In the Firmware Updater app select the product you are updating from the product dropdown list. If you are updating a Metropolis checking the markings on the PCB for the revision and make sure you select the right product revision. Selecting the wrong revision won’t damage your module but the module may not function correctly with the wrong firmware installed.
- Select the firmware version you will be updating to.
- Click the “Update” button. You will see the progress of the update in the log window and your module may begin to flash. You will see an “Update completed successfully” message at the end of the update.
- If there are any problems please contact us via the Help button. Be sure to include the full log window output, the firmware updater version downloaded, and the OS you are using.
